close

原文:Ruby on Rails Guides  Active Storage Overview

轉貼自:https://calvertyang.github.io/2018/05/18/active-storage-overview/

Active Storage 是 Rails 5.2 所新增的功能,它可以讓你輕鬆的將檔案傳送到 Amazon S3Google Cloud Storage  Microsoft Azure Storage 等雲端儲存服務,並將這些檔案附加到 Active Record。

支援一個主要雲端儲存服務,並在其它服務中建立鏡像以實現備援機制,它也提供了用於測試或本地部署的磁碟服務,但重點還是放在雲端儲存。

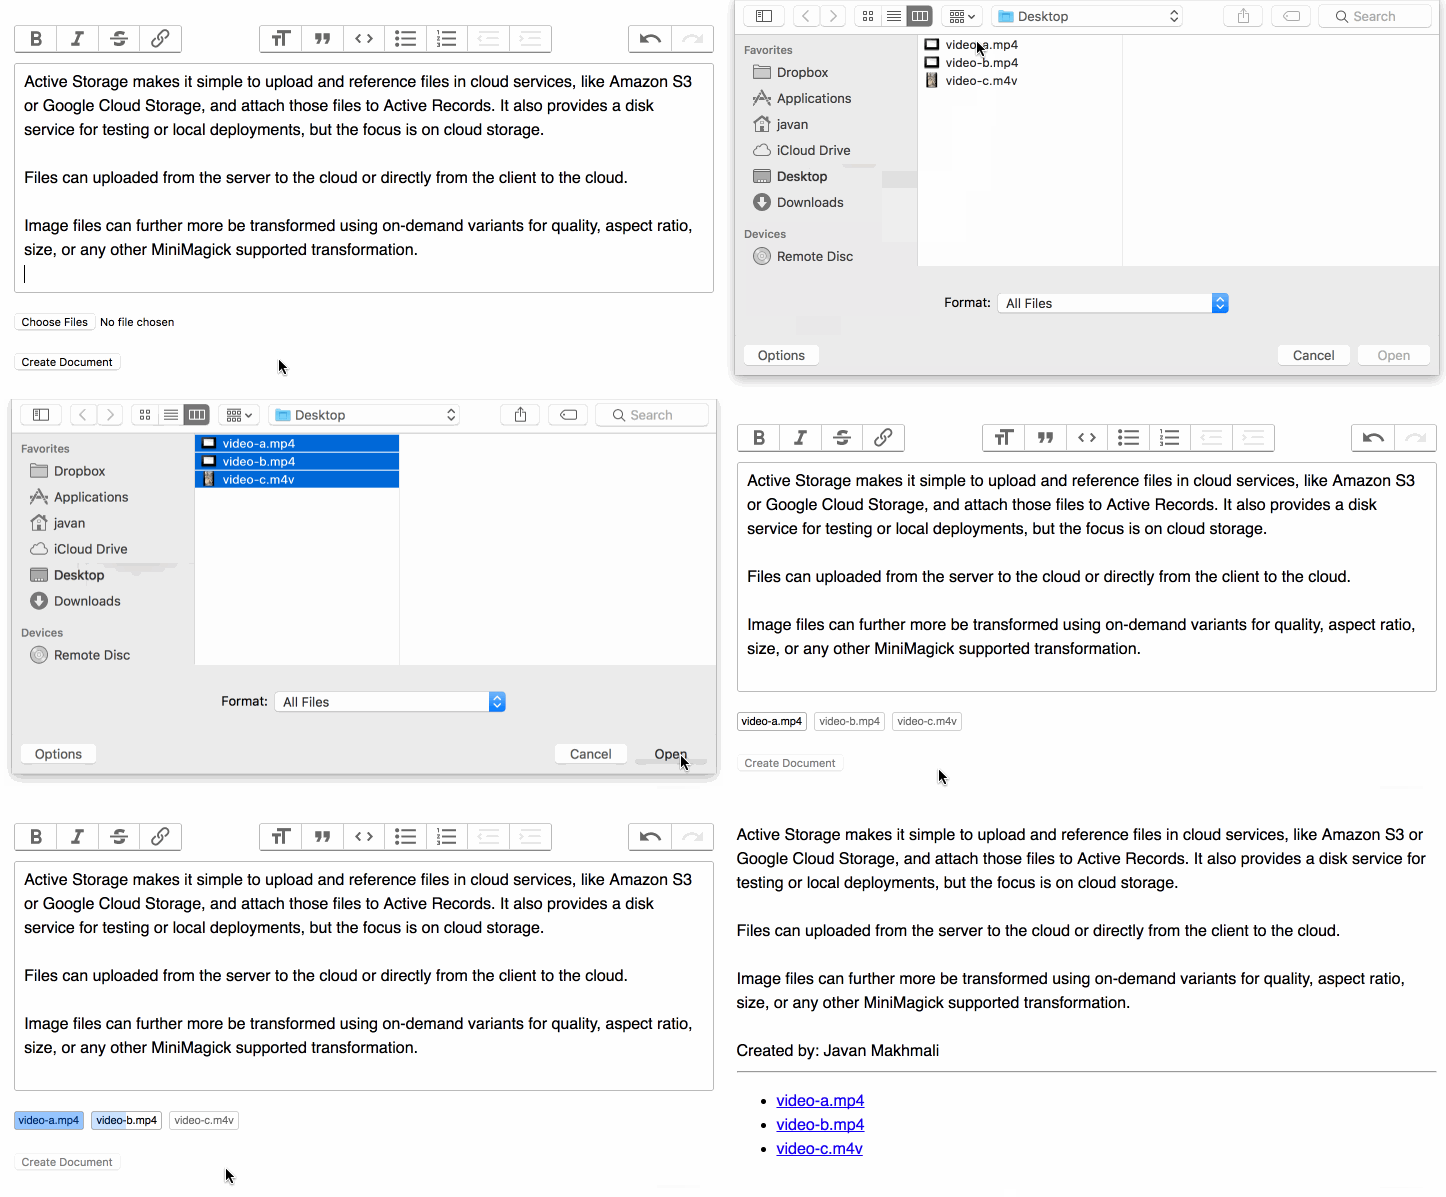
檔案可以從伺服器上傳到雲端或直接從客戶端上傳到雲端。

閱讀本指南後,你將知道:

  • 如何附加一或多個檔案到記錄。
  • 如何刪除檔案。
  • 如何連結到檔案。
  • 如何使用變體(variant)來轉換圖片。
  • 如何產生非圖片檔案的預覽圖,如 PDF 或影片。
  • 如何繞過應用程式伺服器,直接從瀏覽器上傳檔案到儲存服務。
  • 如何清理測試過程中儲存的檔案。
  • 如何實作對其它雲端儲存服務的支援。

1. 什麼是 Active Storage?

Active Storage 方便將檔案上傳到 Amazon S3、Google Cloud Storage 或 Microsoft Azure Storage 等雲端儲存服務,並將這些檔案附加到 Active Record 物件。它配備了本地磁碟服務以進行開發和測試,並支援將檔案鏡像到次要服務以進行備份和遷移。

使用 Active Storage,應用程式可以透過 ImageMagick 轉換上傳圖片,產生非圖片檔案(如 PDF 或影片)的預覽圖,並從任意檔案中提取中繼資料。

2. 安裝

Active Storage 在應用程式資料庫中使用兩個名為 active_storage_blobs  active_storage_attachments 的資料表。將應用程式升級到 Rails 5.2 後,執行 rails active_storage:install 來產生用來建立這些資料表的遷移。使用 rails db:migrate 來執行遷移。

 config/storage.yml 定義 Active Storage 服務。對應用程式使用的每個服務,提供一個名稱和必要的設定。下面的範例定義了三個名為 localtest  amazon 的服務:

1
2
3
4
5
6
7
8
9
10
11
12
local:
  service: Disk
  root: <%= Rails.root.join("storage") %>

test:
  service: Disk
  root: <%= Rails.root.join("tmp/storage") %>

amazon:
  service: S3
  access_key_id: ""
  secret_access_key: ""

透過設定 Rails.application.config.active_storage.service 告訴 Active Storage 要使用哪個服務。由於每個環境都可能使用不同的服務,因此建議在每個環境的基礎設定上進行。要在開發環境中使用先前範例中的磁碟服務,你可以將以下內容加到 config/environments/development.rb

1
2
# 在本地儲存檔案。
config.active_storage.service = :local

要在生產環境使用 Amazon S3,你可以將以下內容加到 config/environments/production.rb

1
2
# 在 Amazon S3 儲存檔案。
config.active_storage.service = :amazon

繼續閱讀來取得關於內建服務轉接器(如 Disk  S3)及其所需設定的更多資訊。

2.1. 磁碟服務

 config/storage.yml 定義磁碟服務:

1
2
3
local:
  service: Disk
  root: <%= Rails.root.join("storage") %>

2.2. Amazon S3 服務

 config/storage.yml 定義 S3 服務:

1
2
3
4
5
6
amazon:
  service: S3
  access_key_id: ""
  secret_access_key: ""
  region: ""
  bucket: ""

 aws-sdk-s3 gem 加到 Gemfile

1
gem "aws-sdk-s3", require: false

Active Storage 的核心功能需要以下權限:s3:ListBuckets3:PutObjects3:GetObject s3:DeleteObject。如果你設定了其它上傳選項,如 ACL 設定,則可能需要額外的權限。

如果你想使用環境變數、標準 SDK 設定檔、設定檔、IAM 實例設定檔或工作角色,則可以省略上面範例中的 access_key_idsecret_access_key  region 值。Amazon S3 服務支援 AWS SDK 文件中描述的所有認證選項。

2.3. Microsoft Azure Storage 服務

 config/storage.yml 定義 Azure Storage 服務:

1
2
3
4
5
azure:
  service: AzureStorage
  storage_account_name: ""
  storage_access_key: ""
  container: ""

 azure-storage gem 加到 Gemfile

1
gem "azure-storage", require: false

2.4. Google Cloud Storage 服務

 config/storage.yml 定義 Google Cloud Storage 服務:

1
2
3
4
5
google:
  service: GCS
  credentials: <%= Rails.root.join("path/to/keyfile.json") %>
  project: ""
  bucket: ""

可以選擇提供一個 Hash 憑證來取代密鑰路徑:

1
2
3
4
5
6
7
8
9
10
11
12
13
14
15
google:
  service: GCS
  credentials:
    type: "service_account"
    project_id: ""
    private_key_id: <%= Rails.application.credentials.dig(:gcs, :private_key_id) %>
    private_key: <%= Rails.application.credentials.dig(:gcs, :private_key) %>
    client_email: ""
    client_id: ""
    auth_uri: "https://accounts.google.com/o/oauth2/auth"
    token_uri: "https://accounts.google.com/o/oauth2/token"
    auth_provider_x509_cert_url: "https://www.googleapis.com/oauth2/v1/certs"
    client_x509_cert_url: ""
  project: ""
  bucket: ""

 google-cloud-storage gem 加到 Gemfile

1
gem "google-cloud-storage", "~> 1.8", require: false

2.5. 鏡像服務

你可以透過定義鏡像服務來讓多個服務保持同步。當檔案被上傳或刪除時,它會在所有鏡像服務中完成。鏡像服務可用來幫助生產環境中服務之間的遷移。你可以開始鏡像到新服務,將現有檔案從舊服務複製到新服務,然後全力投入新服務。根據上述定義你想要使用的每項服務,從鏡像服務中引用它們。

1
2
3
4
5
6
7
8
9
10
11
12
13
14
15
16
17
18
19
s3_west_coast:
  service: S3
  access_key_id: ""
  secret_access_key: ""
  region: ""
  bucket: ""

s3_east_coast:
  service: S3
  access_key_id: ""
  secret_access_key: ""
  region: ""
  bucket: ""

production:
  service: Mirror
  primary: s3_east_coast
  mirrors:
    - s3_west_coast

檔案由主服務提供。

3. 將檔案附加到記錄

3.1. has_one_attached

has_one_attached 指令設定了記錄和檔案間的一對一關係。每個記錄可以附加一個檔案。

例如,假設你的應用程式有一個 User 模型。如果想讓每個使用者都有一個頭像,請這樣定義 User模型:

1
2
3
class User < ApplicationRecord
  has_one_attached :avatar
end

你可以建立一個帶有頭像的使用者:

1
2
3
4
5
6
7
8
9
10
11
12
class SignupController < ApplicationController
  def create
    user = User.create!(user_params)
    session[:user_id] = user.id
    redirect_to root_path
  end

  private
    def user_params
      params.require(:user).permit(:email_address, :password, :avatar)
    end
end

呼叫 avatar.attach 將頭像附加到現有使用者:

1
Current.user.avatar.attach(params[:avatar])

呼叫 avatar.attached? 來確定特定使用者是否有頭像:

1
Current.user.avatar.attached?

3.2. has_many_attached

has_many_attached 指令設定了記錄和檔案間的一對多關係。每個記錄可以附加多個檔案。

例如,假設你的應用程式有一個 Message 模型。如果想讓每個訊息都有多張圖片,請這樣定義 Message 模型:

1
2
3
class Message < ApplicationRecord
  has_many_attached :images
end

你可以建立一則帶有多張圖片的訊息:

1
2
3
4
5
6
7
8
9
10
11
class MessagesController < ApplicationController
  def create
    message = Message.create!(message_params)
    redirect_to message
  end

  private
    def message_params
      params.require(:message).permit(:title, :content, images: [])
    end
end

呼叫 images.attach 將圖片附加到現有訊息:

1
@message.images.attach(params[:images])

呼叫 images.attached? 來確定特定訊息是否有圖片:

1
@message.images.attached?

譯者註:若使用 AJAX 來送出表單,可能會出現 No 'Access-Control-Allow-Origin' header is present on the requested resource. 的錯誤訊息,以 Amazon S3 為例,需要登入 AWS 後台修改 CORS 設定,設定範例如下:

1
2
3
4
5
6
7
8
9
10
11
12
13
14
15
16
<?xml version="1.0" encoding="UTF-8"?>
<CORSConfiguration xmlns="http://s3.amazonaws.com/doc/2006-03-01/">
<CORSRule>
    <AllowedOrigin>*</AllowedOrigin>
    <AllowedMethod>GET</AllowedMethod>
    <MaxAgeSeconds>3000</MaxAgeSeconds>
    <AllowedHeader>Authorization</AllowedHeader>
</CORSRule>
<CORSRule>
    <AllowedOrigin>*</AllowedOrigin>
    <AllowedMethod>PUT</AllowedMethod>
    <AllowedMethod>POST</AllowedMethod>
    <MaxAgeSeconds>3000</MaxAgeSeconds>
    <AllowedHeader>*</AllowedHeader>
</CORSRule>
</CORSConfiguration>

4. 刪除檔案

要從模型中刪除附件,請在附件上呼叫 purge。如果你的應用程式有設定使用 Active Job,刪除作業可以在背景完成。刪除作業會從儲存服務中刪除 blob 和檔案。

1
2
3
4
5
# 同步刪除頭像和實際資源檔案。
user.avatar.purge

# 透過 Active Job 非同步刪除相關模型和實際資源檔案。
user.avatar.purge_later

5. 檔案連結

為 blob 產生一個指向應用程式的永久連結。存取時,會返回一個重新導向到實際服務端點的連結。這種間接的方式將公開網址從實際網址分離開來,並允許例如鏡像不同服務中的附件以實現高可用性。重新導向連結的 HTTP 過期時間為 5 分鐘。

1
url_for(user.avatar)

要建立下載連結,請使用 rails_blob_{path|url} 輔助方法。使用這個輔助方法可以讓你設定 disposition。

1
rails_blob_path(user.avatar, disposition: "attachment")

6. 轉換圖片

要建立不同尺寸的圖片,請在 Blob 上呼叫 variant。你可以傳送任何 MiniMagick 所支援的轉換方式到此方法。

要啟用轉換功能,請將 mini_magick gem 加到 Gemfile

1
gem 'mini_magick'

當瀏覽器存取不同尺寸的圖片網址時,Active Storage 會將原始的 blob 延遲轉換為指定的格式,並導向到它新的服務位置。

1
<%= image_tag user.avatar.variant(resize: "100x100") %>

7. 預覽檔案

一些非圖片檔案可以被預覽:也就是說,他們可以用圖片來呈現。例如,可以透過擷取第一個影格來預覽影片檔。Active Storage 內建支援預覽影片和 PDF 文件。

1
2
3
4
5
6
7
<ul>
  <% @message.files.each do |file| %>
    <li>
      <%= image_tag file.preview(resize: "100x100>") %>
    </li>
  <% end %>
</ul>

擷取預覽圖片需要第三方應用程式,用於影片的 ffmpeg 和用於 PDF 的 mutool。這些函式庫不是由 Rails 提供的。你必須自行安裝他們才能使用內建的預覽器。在安裝和使用第三方軟體前,請確定你了解這樣做所牽涉的許可。

8. 直接上傳

Active Storage 及其包含的 JavaScript 函式庫支援從客戶端直接上傳到雲端。

8.1. 安裝直接上傳功能

  1. 在應用程式的 JavaScript 封裝載入 activestorage.js
    使用 Asset Pipeline:

    1
    
    //= require activestorage
    

    使用 npm 套件:

    1
    2
    
    import * as ActiveStorage from "activestorage"
    ActiveStorage.start()
    
  2. 在檔案輸入欄位中註記直接上傳。

    1
    
    <%= form.file_field :attachments, multiple: true, direct_upload: true %>
    
  3. 就是這樣!在表單提交後會開始上傳檔案。

8.2. 直接上傳功能的 JavaScript 事件

事件名稱 事件目標 事件資料(event.detail 描述
direct-uploads:start <form> 已提交包含直接上傳欄位的表單。
direct-upload:initialize <input> {id, file} 表單提交後,處理每個檔案。
direct-upload:start <input> {id, file} 開始直接上傳。
direct-upload:before-blob-request <input> {id, file, xhr} 向你的應用程式請求直接上傳中繼資料之前。
direct-upload:before-storage-request <input> {id, file, xhr} 請求儲存檔案之前。
direct-upload:progress <input> {id, file, progress} 請求儲存檔案的進度。
direct-upload:error <input> {id, file, error} 發生錯誤。除非此事件被取消,否則將顯示提醒
direct-upload:end <input> {id, file} 直接上傳已結束。
direct-uploads:end <form> 所有直接上傳都已結束。

8.3. 範例

你可以使用這些事件來顯示上傳的進度。

在表單內顯示上傳的檔案:

1
2
3
4
5
6
7
8
9
10
11
12
13
14
15
16
17
18
19
20
21
22
23
24
25
26
27
28
29
30
31
32
33
34
35
36
37
38
// direct_uploads.js

addEventListener("direct-upload:initialize", event => {
  const { target, detail } = event
  const { id, file } = detail
  target.insertAdjacentHTML("beforebegin", `
    <div id="direct-upload-${id}" class="direct-upload direct-upload--pending">
      <div id="direct-upload-progress-${id}" class="direct-upload__progress" style="width: 0%"></div>
      <span class="direct-upload__filename">${file.name}</span>
    </div>
  `)
})

addEventListener("direct-upload:start", event => {
  const { id } = event.detail
  const element = document.getElementById(`direct-upload-${id}`)
  element.classList.remove("direct-upload--pending")
})

addEventListener("direct-upload:progress", event => {
  const { id, progress } = event.detail
  const progressElement = document.getElementById(`direct-upload-progress-${id}`)
  progressElement.style.width = `${progress}%`
})

addEventListener("direct-upload:error", event => {
  event.preventDefault()
  const { id, error } = event.detail
  const element = document.getElementById(`direct-upload-${id}`)
  element.classList.add("direct-upload--error")
  element.setAttribute("title", error)
})

addEventListener("direct-upload:end", event => {
  const { id } = event.detail
  const element = document.getElementById(`direct-upload-${id}`)
  element.classList.add("direct-upload--complete")
})

加上樣式:

1
2
3
4
5
6
7
8
9
10
11
12
13
14
15
16
17
18
19
20
21
22
23
24
25
26
27
28
29
30
31
32
33
34
35
36
37
38
39
/* direct_uploads.css */

.direct-upload {
  display: inline-block;
  position: relative;
  padding: 2px 4px;
  margin: 0 3px 3px 0;
  border: 1px solid rgba(0, 0, 0, 0.3);
  border-radius: 3px;
  font-size: 11px;
  line-height: 13px;
}

.direct-upload--pending {
  opacity: 0.6;
}

.direct-upload__progress {
  position: absolute;
  top: 0;
  left: 0;
  bottom: 0;
  opacity: 0.2;
  background: #0076ff;
  transition: width 120ms ease-out, opacity 60ms 60ms ease-in;
  transform: translate3d(0, 0, 0);
}

.direct-upload--complete .direct-upload__progress {
  opacity: 0.4;
}

.direct-upload--error {
  border-color: red;
}

input[type=file][data-direct-upload-url][disabled] {
  display: none;
}

9. 移除系統測試過程中儲存的檔案

系統測試透過復原(Rollback)交易來清理測試資料。因為 destroy 永遠不會在對像上呼叫,所以附加的檔案永遠不會被清理。如果你想清除檔案,可以在 after_teardown callback 中完成。在此處操作可以確保測試過程中建立的連線都已完成,並且不會從 Active Storage 收到錯誤,表示無法找到檔案。

1
2
3
4
5
6
7
8
9
10
11
12
class ApplicationSystemTestCase < ActionDispatch::SystemTestCase
  driven_by :selenium, using: :chrome, screen_size: [1400, 1400]

  def remove_uploaded_files
    FileUtils.rm_rf("#{Rails.root}/storage_test")
  end

  def after_teardown
    super
    remove_uploaded_files
  end
end

如果你的系統測試驗證是否刪除帶有附件的模型,並且使用 Active Job,請將測試環境設定為使用行內佇列轉接器,以便立即執行清除工作,而不是在未來的某個時間執行。

你可能也想為測試環境使用單獨的服務定義,以便你的測試不會刪除在開發過程中建立的檔案。

1
2
3
4
5
# 使用行內作業處理,以便立即執行
config.active_job.queue_adapter = :inline

# 在測試環境中分開儲存檔案
config.active_storage.service = :local_test

10. 實作支援其它雲端儲存服務

如果你需要支援除了這些以外的雲端服務,則需要實作 Service。每個服務都透過實作上傳和下載檔案到雲端所需的方法,來擴充 ActiveStorage::Service

arrow
arrow
    文章標籤
    Ruby on Rails
    全站熱搜

    F 發表在 痞客邦 留言(0) 人氣()